Introduction
Stainless steel countertops deliver the durability and professional aesthetic of commercial kitchens without the hefty price tag of a full remodel. Many homeowners want that sleek, industrial look but balk at tearing out perfectly functional existing countertops. The good news: **yes, you can install stainless steel panels over existing countertops** — but only when specific structural and flatness conditions are met.
When done incorrectly, overlay installations produce telltale problems: a hollow drum sound when tapped, adhesion failures that leave soft spots, visible ridges telegraphing through the metal surface, and voided fabrication warranties. Unlike flexible laminate overlays, rigid stainless steel acts as a magnifying glass for every substrate imperfection.
This guide covers how to assess whether your existing countertop qualifies, walks through the installation process step by step, and addresses the most common failures — so you can get a result that holds up for decades.
Key Takeaways
- Stainless steel overlays work only if your existing countertop is structurally sound, level, and properly prepared
- Custom fabrication to exact dimensions is required — off-the-shelf sizing rarely works for overlay installations
- Sound-deadening underlayment prevents the hollow "drum" effect common with metal over air gaps
- Proper adhesive selection and application are critical for lasting adhesion
- DIY is feasible for experienced renovators — edge finishing and precision cuts usually need a professional fabricator
Can You Install Stainless Steel Countertops Over Existing Ones?
The direct answer: Stainless steel panels can be installed over most existing countertop types — laminate, tile, solid surface, and plywood substrates — as long as the base surface is flat, structurally sound, and properly prepared. This approach appeals to homeowners because it avoids demolition, reduces waste, and enables faster installation compared to full countertop replacement.
Why Stainless Steel Overlays Are Different
Unlike flexible laminate or thin vinyl overlays, stainless steel is a rigid material that cannot compress or conform to uneven surfaces. According to industry fabricators, stainless panels will telegraph any substrate imperfections, reflecting high and low spots in the finished product. This makes substrate preparation non-negotiable — a grout line, seam, or dip in your existing countertop will read through the metal as a visible ridge or flex point.
When Overlay Installation Is NOT Advisable
Skip the overlay approach if your existing countertop shows:
- Severe warping or water damage — soft spots or delamination will prevent proper adhesion
- Significant height variation — flatness tolerances for stainless steel range from 0.010 to 0.030 inches per foot depending on panel size
- Structural instability — the existing surface must be firmly anchored to cabinets without deflection
- Appliance clearance issues — adding a stainless overlay typically results in 1.5-inch total countertop thickness, which may affect slide-in ranges, dishwashers, and sink rim alignment

Custom Fabrication Is Required
Unlike modular granite or quartz overlays, stainless steel panels must be custom-fabricated to your exact specifications — which directly affects cost, lead time, and how you plan the project. A standard fabrication scope includes:
- Cutting panels to precise field measurements
- Creating sink and fixture cutouts
- Finishing exposed edges (radius, marine edge, or straight)
- On-site welding to eliminate visible seams
Before placing any order, confirm your fabricator does on-site measuring. Even small dimension errors — a 1/8-inch gap at the backsplash, a misaligned sink cutout — are expensive to fix once the panel is built.
Installing Stainless Steel Countertops Over Existing Ones: A Step-by-Step Guide
The installation process involves surface assessment, substrate preparation, panel fabrication, adhesive bonding with mechanical fastening, and final finishing. Each stage directly affects the next — shortcuts in substrate prep create compounding problems that show up as adhesion failures or surface defects months later.
Prerequisites and Surface Assessment
Substrate Requirements:
Your existing countertop must meet strict criteria:
- Flatness tolerance: Within 0.010 to 0.030 inches per foot, depending on panel dimensions
- Rigidity: No soft spots, delamination, or flex under pressure
- Secure anchoring: Firmly attached to cabinet structure without movement
- Moisture-free: No water damage or active leaks
Tile surfaces can work, but grout lines must be filled flush to create a perfectly planar surface. Laminate and solid surface substrates should be scuffed lightly to provide mechanical grip for adhesives.
Load and Structural Checks:
Stainless steel adds significant weight. 16-gauge stainless steel weighs 2.520 lbs per square foot, while 18-gauge weighs 2.016 lbs per square foot. When combined with a wood backer layer, this creates substantial static load.
Cabinet structures must meet KCMA A161.1 standards, which require cabinets to withstand 15 lbs per square foot for seven days without joint separation. Under this load, shelves and bottoms must not deflect more than 0.0625 inches per linear foot.
Sink and Cutout Planning:
Existing sink cutouts must be documented precisely. The steel panel requires matching cutouts precision-cut during fabrication — this is why working with a professional metal fabricator who offers on-site measuring services is critical for overlay projects.
Tools and Materials Required
Materials:
- Custom-fabricated stainless steel panels (16-gauge recommended)
- Construction adhesive rated for metal-to-substrate bonding (polyurethane or two-part epoxy)
- Sound-deadening compound or cork underlayment sheet
- Neutral-cure silicone sealant (never acetoxy-cure, which corrodes metal)
- Leveling compound for filling grout lines or low spots
Tools:
- Tape measure and 4-foot straightedge (for flatness verification)
- Router or oscillating tool (for minor substrate leveling)
- Caulk gun and finishing supplies
- Temporary weights (sandbags or clamps for curing)
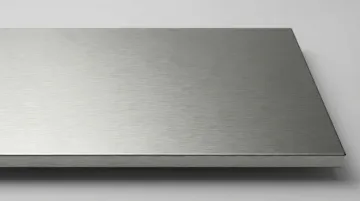
Recommended Gauge:
16-gauge (0.060") stainless steel is the residential standard. It balances durability and affordability, resists dents from heavy cookware, and absorbs sound better than thinner 18-gauge options, preventing a cheap, tinny feel.
How to Install Stainless Steel Countertops Over Existing Ones
Installation follows a defined sequence. The most common failures stem from skipping surface prep or rushing adhesive cure times.
Step 1 — Prepare the Existing Surface:
- Clean thoroughly to remove grease, old caulk, and debris
- Check flatness with a straightedge; fill low spots or grout lines with leveling compound
- Lightly scuff smooth surfaces (laminate, solid surface) to improve adhesive grip
- Disconnect plumbing if working around sink areas
Step 2 — Apply Sound-Deadening Underlayment:
Cork sheet or sound-deadening compound goes down before the steel panel. This prevents the hollow "drum" sound that occurs when bare stainless is tapped or worked on — a telltale sign of a poorly installed overlay.
Step 3 — Set and Bond the Stainless Steel Panel:
Apply construction adhesive in a perimeter-plus-grid pattern. Avoid full-coverage troweling, which traps air bubbles and creates soft spots. Use a serpentine bead pattern that allows trapped air to escape.
Position the fabricated panel carefully — stainless steel bonds within minutes, leaving little room to adjust. Press firmly across the full surface and apply temporary weight (sandbags or edge clamps) throughout the cure period.
Step 4 — Secure Edges and Cutouts:
Once adhesive has cured (typically 24 hours for polyurethane, 4–24 hours for epoxy depending on temperature), seal the following with neutral-cure silicone:
- All perimeter edges
- Around sink cutouts
- At wall or backsplash junctions
Never use acetoxy-cure silicone — it releases acetic acid that corrodes stainless steel from underneath.
Step 5 — Reconnect Fixtures and Finish:
Reinstall the sink and fixtures, ensuring the sink rim sits flush against the steel. Apply a final bead of caulk where the sink meets the countertop surface. Wipe down the steel with a stainless-appropriate cleaner to remove fingerprints and adhesive residue.

Post-Installation Checks and Validation
Before considering the job complete, verify:
- No lifted edges or flex points when pressed across the full surface
- No visible ridges telegraphing through from substrate seams
- Run water and confirm no moisture at the sink seal
- Tap across the surface — any drum sound points to bonding gaps
Fixing a bonding failure now takes an hour. Fixing it after the kitchen is back in use means pulling the panel, stripping adhesive, and starting over.
Common Installation Problems and How to Fix Them
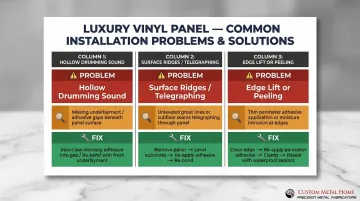
Hollow or Drumming Sound After Installation
Problem: Tapping the countertop produces a hollow, resonant sound in one or more areas.
Fix: If insufficient adhesive coverage or a skipped underlayment caused the gap, start by checking whether the gap is localized and the panel edge is accessible. If so, inject construction adhesive through the edge using a syringe applicator and apply weight while it cures. If the drumming is widespread, plan for full panel removal and re-bonding with proper underlayment.
Surface Ridges or Telegraphing from Substrate
Problem: Visible lines or bumps appear on the stainless steel surface after installation, usually running along grout lines or substrate seams.
Fix: This happens when high grout lines or uneven seams aren't leveled before installation — the rigid metal telegraphs every irregularity beneath it. For mild cases, applying pressure during cure may correct minor flex. For significant ridging, remove the panel, properly level and fill the substrate, then re-bond or replace the panel.
Edge Lift or Peeling at Seams
Problem: One or more edges of the steel panel have begun to lift away from the substrate.
Fix: Edge lift typically traces back to thin adhesive at the perimeter, thermal expansion pulling the metal free, or moisture entering through an unsealed edge. Thoroughly clean and dry the lifted area, apply fresh construction adhesive, then clamp or weight the edge until fully cured. Reseal all perimeter edges with silicone to keep moisture out going forward.
Pro Tips for Installing Stainless Steel Countertops Effectively
Confirm All Dimensions Before Fabrication
Order panels with dimensions confirmed through on-site measuring. For overlay projects specifically, verify existing countertop thickness and account for the added height. Stainless steel panels can't be stretched if cut short, so precision at the ordering stage prevents costly remakes.
Specify a Brushed (Satin) Finish
A No. 4 brushed finish is the industry standard for residential kitchens. Brushed finishes are more forgiving of minor surface imperfections, fingerprints, and hairline scratches that occur during installation and everyday use. Mirror-polished finishes make every smudge and scratch glaringly obvious, requiring frequent polishing to maintain appearance.
Consider Splitting the Project
Handle substrate preparation yourself, then commission panel fabrication and edge work from a professional custom metal fabricator. This approach suits DIYers comfortable with prep and bonding but less confident in precision cutting — and it delivers a better-fitting result without full contractor costs.
Conclusion
Installing stainless steel over existing countertops is a viable upgrade — but the quality of the result depends almost entirely on how well the substrate is prepared, how precisely the panels are fabricated, and whether sound-deadening and proper adhesion steps are followed.
Those aren't small variables — which is why the fabrication partner you choose matters as much as the material itself. Work with a professional metal fabricator who can measure on-site, cut panels to exact specifications, and advise on gauge, finish, and sound-deadening options for your specific layout. Done right, stainless steel over an existing substrate can outlast a full countertop replacement — with zero bonding failures and a surface that holds up to decades of daily use.
Frequently Asked Questions
Can you install stainless steel countertops over existing ones?
Yes, stainless steel panels can be installed over existing countertops if the base surface is flat (within 0.010-0.030 inches per foot), structurally sound, and properly prepared. Panels must be custom-fabricated to exact dimensions, and proper adhesive and sound-deadening steps are critical for success.
What gauge stainless steel is best for countertop overlays?
16-gauge (0.060") stainless steel is the recommended standard for residential overlay applications. It provides optimal durability, resists dents from heavy cookware, and absorbs sound better than thinner 18-gauge options.
Will a stainless steel overlay sound hollow or make noise when tapped?
Hollow sound is a known issue with metal countertops installed over cavities or with poor adhesion. The fix is sound-deadening underlayment (cork sheet or acoustic compound) combined with adhesive applied in a perimeter-plus-grid pattern. Both steps together prevent the drumming effect.
Can stainless steel countertops be installed over tile or laminate?
Yes, both are possible with proper preparation. Tile requires grout lines to be filled flush with leveling compound to create a planar surface. Laminate should be scuffed lightly to improve adhesive grip. Both must be level and structurally sound before bonding.
How do you attach a stainless steel countertop overlay to an existing surface?
Use construction adhesive rated for metal-to-substrate bonding (polyurethane or two-part epoxy) applied in a perimeter-plus-grid pattern. Seal all edges and cutouts with neutral-cure silicone sealant. Your fabricator may also recommend mechanical fasteners depending on the installation.
Do stainless steel countertops scratch easily?
Yes, stainless steel will scratch with daily use. However, a brushed or satin finish hides scratches far better than polished finishes by blending them into the directional grain. Over time, these scratches form a uniform patina that many homeowners find appealing.