The stakes are real. The EPA notes that gas stoves release carbon monoxide, nitrogen dioxide, and particles, and that a range hood vented outdoors significantly reduces exposure. A poorly installed hood — weak suction, unsealed duct joints, improper venting — doesn't just underperform. It can contribute to grease buildup, degraded air quality, and voided appliance warranties.
This guide walks through the complete installation sequence, from safety prerequisites to post-installation testing.
Key Takeaways
- Straightforward replacements on existing ductwork take 2–4 hours; new duct runs or electrical work can take a full day.
- Always confirm hood width, CFM rating, mounting height, and duct diameter match your cooktop and layout before starting.
- You need a second person — lifting and positioning a range hood alone isn't safe.
- Use rigid metal duct and metal foil tape only; flexible ducting restricts airflow by up to 50%.
- Never skip post-installation testing — most performance problems surface immediately if you check properly.
Range Hood Installation Guide
Range hood installation breaks down into four phases: prep and site assessment, duct work, hood mounting, and final validation. Each phase builds on the last — rushing any one of them creates problems that are expensive to fix once walls are closed and covers are on.
Realistic time expectations:
- Existing duct run, straightforward replacement: 2–4 hours with two people
- New duct penetration and electrical work: full day, or split across trades
Prerequisites and Safety Considerations
Before touching a single wall, confirm these items:
Mounting height — Height requirements vary by model and manufacturer. Common guidance runs 24–30 inches above electric cooktops and 30–36 inches above gas, but your hood's manual is the authoritative source. Broan-NuTone specifies 24–30 inches for many models; Zephyr's Siena manual calls for 26–34 inches. Always follow the specific hood and cooktop manufacturer instructions.
Width and CFM — The hood should match or slightly exceed your cooktop width. CFM rating should suit your cooktop's BTU output and cooking style. ASHRAE Standard 62.2 sets a minimum 100 CFM for vented range hoods; California's energy code uses the same baseline for compliance verification.
Duct compatibility — Duct diameter is model-specific, not universal. Vent-A-Hood's single-blower units require 6-inch round duct; dual-blower models need 8-inch. Check your hood's manual. If existing ductwork is flexible corrugated material, replace it — flexible duct traps grease and chokes airflow.
Non-negotiables:
- Shut off the circuit breaker before beginning — no exceptions
- Per IRC 2021 Section M1503.3, ductwork must terminate outdoors — never in an attic, crawlspace, or interior wall cavity
- If the wall cavity contains plumbing or live wiring, stop and call a professional
Also check local building codes. Some jurisdictions have specific CFM minimums or ducted-only requirements. If your hood will exhaust more than 400 CFM, the IRC requires makeup air provisions — confirm this with your local building department.
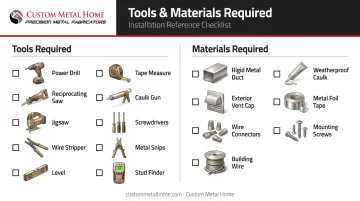
Tools and Materials Required
Tools checklist:
- Power drill with 1¼" and long (6"+) bits
- Reciprocating saw or oscillating tool
- Jigsaw or keyhole saw
- Wire stripper
- Level
- Tape measure
- Caulk gun
- Flathead and Phillips screwdrivers
- Metal snips or cutting pliers
- Stud finder (or use a small pilot hole as a substitute)
Materials checklist:
- Rigid metal duct sections (sized to your hood's exhaust outlet)
- Exterior vent cap with gravity damper
- Wire connectors (appropriately rated for your circuit)
- Building wire (if hardwiring)
- Weatherproof exterior caulk
- Metal foil tape for sealing all duct joints (not standard cloth duct tape — DOE recommends foil tape, mastic, or butyl tape for duct sealing)
- Mounting screws and anchors appropriate for stud or masonry
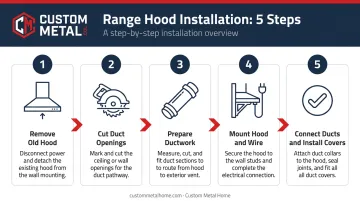
How to Install a Range Hood: Step-by-Step
Follow this sequence in order. Skipping duct prep before mounting the hood is the most common mistake — discovering an obstruction after the hood is physically mounted forces a full dismount.
Step 1: Remove the old range hood (if replacing)
- Shut off the circuit breaker powering the existing hood.
- Unplug or disconnect wiring — photograph all connections before disconnecting.
- Have your second person support the hood's weight while you remove mounting screws.
Step 2: Locate, mark, and cut duct openings
- Use the new hood's template (or measurements) to mark the interior duct location on the wall.
- Drill a small pilot hole first — confirm no plumbing or wiring is present.
- Cut the interior hole with a reciprocating saw (match your duct diameter).
- Drill locator holes extending through the exterior wall.
- Cut the matching exterior opening.
- Fit the exterior vent cap, seal the perimeter with weatherproof caulk, and secure with screws.
Step 3: Prepare the ductwork
- Run rigid metal duct sections from the wall opening to the hood's exhaust outlet location.
- Seal every joint with metal foil tape — no gaps.
- Keep the duct run as short and straight as possible — every elbow and additional foot reduces effective airflow. Equivalent-foot counts vary by manufacturer: Vent-A-Hood rates a 90-degree elbow at 5 feet; Zephyr rates it at 15. Check your hood's manual for the specific value.
- If the hood includes a damper, position it before finalizing duct lengths.
Step 4: Mount the hood and make electrical connections
- With your second person holding the hood in position, insert mounting screws through the hood's mounting slots into wall studs or anchors.
- Remove the grease filter for better access; level the hood before tightening.
- Tighten upper screws before lower screws.
- Run electrical wiring from the breaker to the hood's terminal box with sufficient slack.
- Strip wire ends and connect by color — black to black, white to white, copper ground to ground.
If you have any doubt about hardwiring connections or local code compliance, stop and call a licensed electrician. New circuit installation always requires a licensed professional.
Step 5: Connect ductwork and install covers
- Connect the duct run to the hood's exhaust outlet.
- Seal the joint with metal foil tape.
- Reinstall the grease filter.
- Attach the decorative chimney cover or duct surround per the owner's manual.
- Restore breaker power and run the hood briefly to confirm operation before finalizing all cover screws.
One additional note for custom hood shells: if you're working with a fabricated metal shell — such as those made by Custom Metal Home in Addison, IL — the shell arrives pre-cut for the insert, with CAD drawings specifying the exhaust outlet position and mounting slot locations. Share those drawings with your contractor before installation day so duct prep and mounting can be coordinated in a single visit.
Post-Installation Checks and Validation
Run through these checks before calling the job done — most installation problems show up immediately under load.
Visual and structural checks:
- Hood is level
- All duct joints sealed with metal foil tape — no gaps or loose sections
- Exterior vent cap damper opens when the fan runs, closes when it stops
- No wiring is pinched or exposed anywhere along the run
Functional testing:
- Run the hood at maximum speed and hold a piece of paper at the hood's perimeter — adequate capture velocity should draw it toward the hood
- Go outside and confirm airflow is exiting the vent cap
- Listen for rattling or vibration that may indicate loose duct connections
Warning signs to address immediately:
- Weak suction right after install → check for a stuck damper, kinked duct, or mismatched duct diameter
- Fan runs but no air exits the exterior cap → the duct path has a blockage or disconnection
- Both issues require diagnosis before regular use — check the damper, duct connections, and exterior cap before running the hood again

Common Installation Problems and Fixes
Most range hood issues trace back to three root causes: ductwork, mounting, or wiring. Here's how to diagnose and fix the most common ones.
Weak Suction After Installation
Fan runs, but smoke and steam still escape into the kitchen.
Likely causes:
- Flexible (accordion) duct used instead of rigid metal
- Too many bends in the duct run
- Exterior vent cap damper partially blocked or stuck closed
Fix: Walk the full duct run. Replace any flexible sections with rigid metal. Reduce elbow count where possible. Check the exterior vent cap — clear debris and confirm the damper swings freely when the fan is running.
Hood Vibrates or Makes Excessive Noise
Rattling or vibration during operation that wasn't present during initial testing.
Likely causes:
- Duct sections not fully seated or taped at joints
- Mounting screws not fully tightened
- Grease filter not seated correctly in its track
Fix: Re-check every duct joint and reseal with metal foil tape. Tighten all mounting screws. Remove and reseat the grease filter until it snaps fully into its frame.
Hood Does Not Power On
No fan, no lights, no control panel response after restoring breaker power.
Likely causes:
- Circuit breaker tripped during installation
- Wire connectors not fully tightened (open circuit)
- Incorrect wire pairing (color mismatch)
Solution: Reset the breaker. If it trips again immediately, there's a wiring short — shut off power and recheck all connections. If connections look correct but the hood still won't power on, call a licensed electrician before proceeding.
If all three checks come back clean and problems persist, consult your hood's manufacturer documentation or contact the installer — some issues point to a defective unit rather than an installation error.
Pro Tips for Installing a Range Hood Effectively
Sequence matters: Install surrounding cabinets, ceilings, and finishes before the range hood. Dust and debris from nearby work contaminate the fan and filters if the hood goes in first.
Plan the duct path before mounting: Cut the duct pathway before positioning the hood, not after. Discovering an obstruction once the hood is mounted means a full dismount. For kitchens with non-standard wall configurations or island setups, a custom metal fabricator can fabricate made-to-measure duct transitions and offsets that maintain proper diameter — consult one before defaulting to a flex-duct workaround.
Document everything before closing walls: Before installing covers or closing walls, capture:
- Photos of all wiring connections and duct routing
- The hood model number (written down, not just photographed)
- The installation manual — kept somewhere accessible, not archived in a drawer
You'll need the model number and manual for filter replacements and warranty claims.
Some installations go beyond standard DIY scope. Bring in a licensed professional if the job requires:
- Venting through the roof
- Running a new dedicated electrical circuit
- Working around structural elements inside the wall cavity
These scenarios carry real safety risk — don't treat them as variations of a standard replacement.
Conclusion
Installation quality directly determines long-term performance. A properly vented, correctly mounted, and well-sealed hood removes grease, smoke, and cooking odors for years. A rushed installation degrades air quality, creates fire hazards, and often requires expensive rework once performance problems become impossible to ignore.
Before calling the job done, work through this final checklist:
- Plan the duct pathway before opening any walls
- Confirm all electrical and structural prerequisites are met
- Use a second person for mounting — hoods are heavy and awkward solo
- Run every post-installation check, including airflow, lighting, and fan speed
The testing phase takes fifteen minutes. It's the step most people skip, and the one most likely to surface problems before they become expensive repairs.
Frequently Asked Questions
How much does it cost to install a range hood?
DIY replacement using existing ductwork typically runs $50–$150 in materials. Professional installation averages around $750 according to Bob Vila, with full installations including new ductwork averaging higher. Costs vary significantly by region and project complexity — get multiple quotes before committing.
Can I install a range hood myself?
Yes, for a straightforward replacement where ductwork is already in place and you're comfortable with basic electrical connections. New duct runs, roof venting, or hardwiring a new circuit should involve a licensed electrician or professional installer.
Do range hoods have to be vented outside?
Ducted hoods must vent to the exterior — the IRC prohibits termination in attics, crawlspaces, or interior wall cavities. Ductless/recirculating hoods are a code-allowed exception, filtering and recirculating air through charcoal filters, though they're less effective at removing heat and grease.
Do you need an electrician to install a range hood?
Homeowners comfortable with basic wiring can handle connecting to an existing circuit. New circuit installation, panel work, or any uncertainty about local code compliance warrants a licensed electrician — electrical permits are required in most jurisdictions when new wiring is run.
Are range hoods plugged in or hard-wired?
Both options exist. Some hoods use a standard three-prong plug connected to an accessible outlet; others require hardwiring directly to the circuit. Hardwiring is preferred for a cleaner, permanent installation — check your model's manual to confirm which applies before you start.
What height should a range hood be installed above the stove?
Standard ranges are 24–30 inches above electric cooktops and 30–36 inches above gas, but mounting height is model-specific — always follow your hood manufacturer's manual. Too high reduces capture effectiveness; too low creates overheating risk.